Before you start
| You need | Details |
|---|---|
| WordPress | 6.4 or newer |
| WooCommerce | 8.0 or newer, with your payment methods set up |
| PHP | 7.4 or newer. For big photo uploads set post_max_size to 32M and memory_limit to 256M or more (ask your host). |
| HTTPS | Your site must use https://. Phone uploads and QR codes need it. |
| Mockup photos | A plain photo of each product and colour, front and back, square works best (for example 1000 × 1000 px). |
Tip: try everything on a staging copy of your site first and place one test order before going live.
01Install the plugin
- In WordPress go to Plugins → Add New Plugin → Upload Plugin.
- Choose
tee-studio-kit.zip, click Install Now, then Activate. - Activate your licence. Enter the licence key from your purchase email when Tee Studio Kit asks for it. The customer designer only works while the licence is active.
- A new Tee Studio Kit menu appears in the left sidebar. Activating the plugin doesn't create any pages or products and doesn't change your existing pages.
To update later, upload the newer tee-studio-kit.zip the same way and choose Replace current with uploaded. Your products, settings and order files are kept.
02Add your logo and links
Open Tee Studio Kit → Branding & links.
Your logo
Shown at the top of the designer on phones, computers and the kiosk. Use a white or light logo on a transparent background (PNG, WebP or SVG), about 600 × 150 px.
BYO quote page
The page where customers ask you to print on garments they bring in. The BYO tab shows a QR code and a button to it. Leave it empty to hide the BYO tab.
After a kiosk order, customers see a "Follow us" QR code for this profile. Leave it empty to hide it.
Accessibility fixes
Optional. Adds missing names to common theme buttons and links on shop pages. Turn it on if an accessibility scanner reports problems, then check your theme still looks right.
Click Save branding.
03Create a product base
A product base holds everything about one designable product: its mockup photos, print areas, colours, sizes and prices. You set it up once and link it to a WooCommerce product.
- Go to Tee Studio Kit → Product bases → Add product base, give it a title (for example "Classic Tee") and click Publish. The editor opens below the title.
- Add a mockup photo. Pick the colour and view (front or back) and use Upload directly to this colour and view. Repeat for each colour you sell.
- Draw the print area. Drag and resize the dashed box over the part of the photo where you can print, then enter its real width in millimetres. Tee Studio Kit uses this size to make the print file at 300 DPI. For an odd shape, upload an SVG outline as a custom shape.
- Add setups, printing methods and colours. A setup is a product type such as Tee, Hoodie or Kids Tee. Add the printing methods you offer (DTF, embroidery, sublimation, UV, laser) and the colours, each with an optional extra price and the sizes it comes in.
- Check it as a customer. Click Desktop live preview or Mobile live preview at the bottom of the editor and try designing something.
- Click Save product base. Publishing or updating the WordPress title alone does not save editor changes.
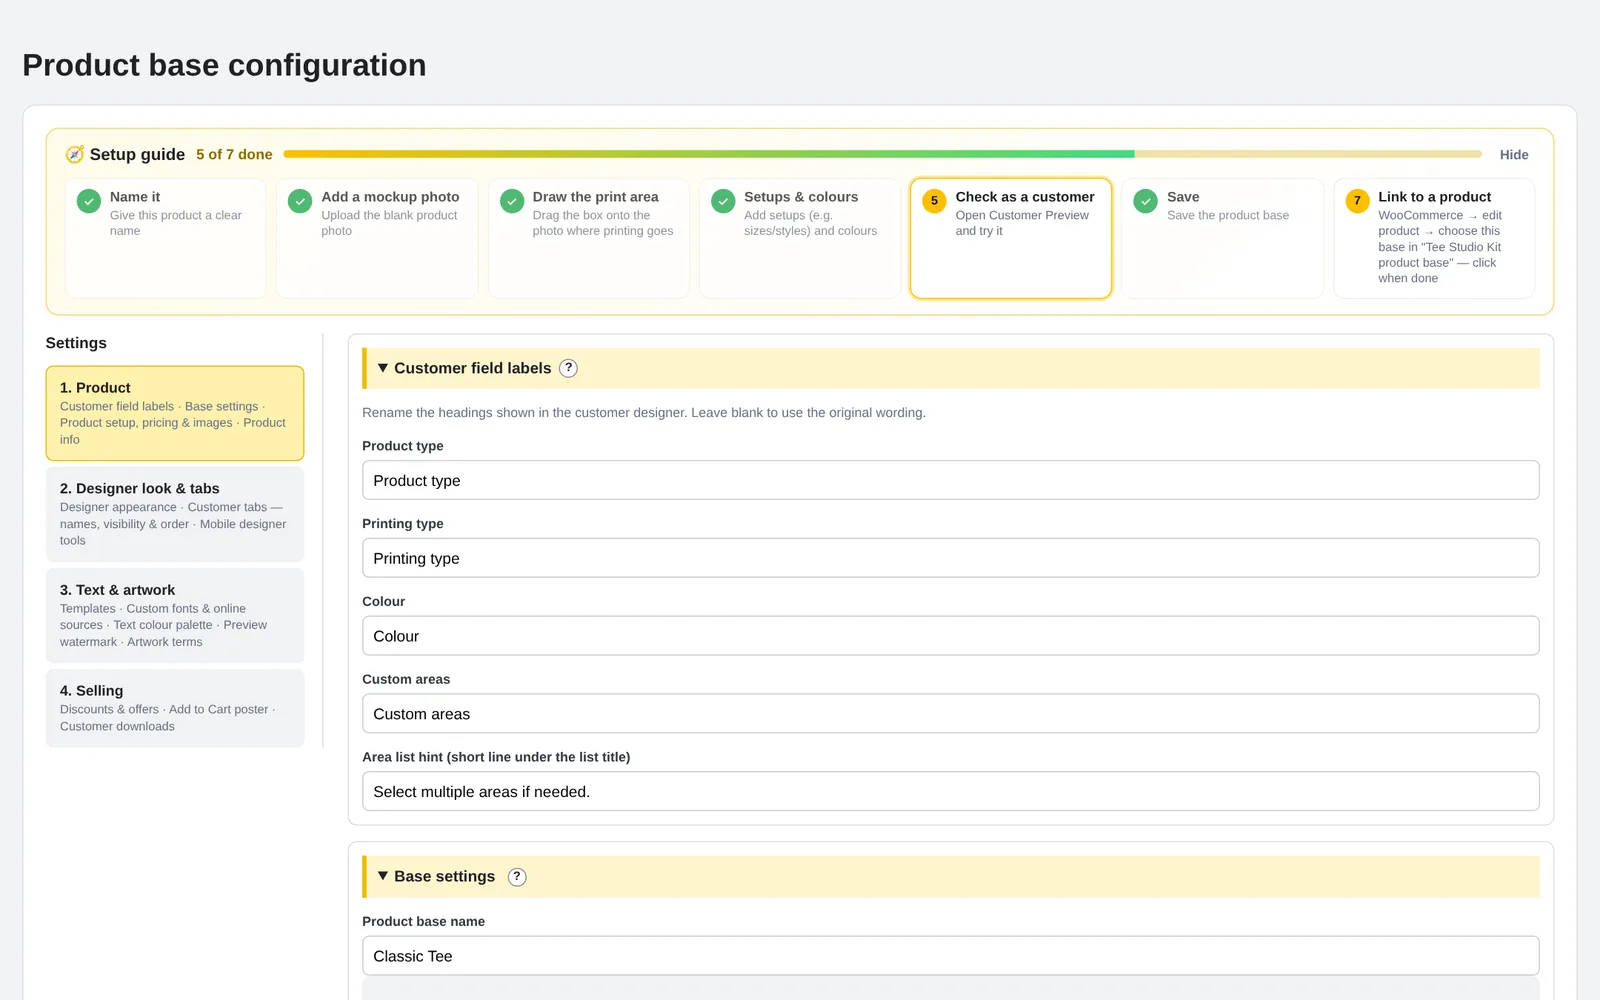
Tip: the setup guide at the top of the editor ticks off each step as you go. Use Duplicate in the Product bases list to start a new product from one you've already set up.
04Customise the designer
The settings on the left of the editor are grouped by what they change. Everything here is per product base.
Product
- Rename what customers see (Product type, Printing type, Colour, Quantity…) and add short hints
- Prices for setups, colours, sizes, print areas and printing methods
- Extra customer options: dropdowns with their own extra price
- Banner image or text, and a Product info pop-up with size guides
Designer look & tabs
- Show, hide, rename and reorder each tab
- Choose which tabs appear on phones, computers and the kiosk
- Tools in the phone toolbar
Text & artwork
- Ready-made templates customers can start from
- Upload your own fonts and set the text colour palette
- Optional preview watermark
- Artwork terms customers must accept, and the low-resolution warning
Selling
- Quantity and spend discounts, and an offers message
- Add to Cart pop-up poster
- Which files customers can download after ordering
Save the product base after changing settings.
05Link it to a WooCommerce product
- Go to Products → Add New (or edit an existing product). It must be a Simple product.
- Enter the normal price in Regular price. This is the starting price; the designer adds your extras on top.
- Under Product data → General, choose the product base in Tee Studio Kit product base.
- Click Publish or Update. Both the product and the product base must be published.
Good to know: colours, sizes and setups live in the designer, not as WooCommerce variations, so WooCommerce doesn't track stock per size or colour. Tax, shipping and payment still work as normal.
06Show the designer on your site
Linked products get a Customize this product button on the product page that opens the full-screen designer.
To put the designer on any page, add a Shortcode block (or an Elementor Shortcode widget) with:
[tee_studio_kit product_id="123"]
Replace 123 with the WooCommerce product ID (not the product base ID). You can set the height too: [tee_studio_kit product_id="123" height="1100"].
07Orders and print files
Open WooCommerce → Orders and click an order. Under each designed item you'll find Design files:
- Print PNG for each print area: transparent, at the real size you set, 300 DPI
- Mockup preview of how the customer saw it
- Original uploads from the customer
- Design file that reopens the design for edits
The new-order email to your store also attaches the print files. Customer choices (setup, colour, size, printing type and print areas) are listed on the order line.
Storage: artwork is kept as private files in wp-content/uploads. Designs that are never ordered are deleted after about 48 hours. Include your uploads folder in backups.
08Run the in-store kiosk
Use a portrait touchscreen at least 700 px wide (1080 × 1920 is ideal) with a web browser in full-screen mode.
- Go to Tee Studio Kit → Kiosk and tick Enable kiosk mode.
- Pickup store: kiosk orders never show postage. Type a word from your pickup shipping method's name to show only that pickup option, or leave it empty to show all pickup options.
- Screen saver (optional): add pictures or videos, portrait 1080 × 1920 looks best, and how long to wait before it starts.
- On the kiosk, open the designer link once with
&kiosk=1added to the end, for exampleyourstore.com/?thd_designer=1&product_id=123&kiosk=1. The device stays in kiosk mode from then on.
How customers pay
At checkout the kiosk shows a QR code. The customer scans it with their phone and pays through your normal WooCommerce checkout. When the order is placed, the kiosk clears itself for the next customer.
Taking a device out of kiosk mode
Open any designer link on it with &kiosk=0 at the end.
More tools
Phone transfer
Tee Studio Kit → Phone transfer gives your shop computers a private, PIN-protected page. Customers scan its QR code and send photos or files straight to that computer.
Save & send my design
Customers can save an unfinished design to their phone or email by QR code or link. It reopens in the designer for 30 days.
Export and import
Use Export setups and Import base backup at the bottom of the editor to copy product bases between sites.
Template library
Tee Studio Kit → Template library holds templates you can switch on for any product base.
Troubleshooting
"This designer is not available"
Check all four: the product is a Simple product, it's published, it has a product base chosen, and that product base is published with Save product base clicked at least once.
Changes don't show up, or the designer looks broken
A caching or speed plugin is usually serving an old copy. In your caching plugin, exclude pages with thd_designer=1, the plugin's AJAX and REST requests, and turn off script combining, delaying and HTML minification for the designer. Then purge the cache.
Large photos fail to upload
Customer images can be up to 8 MB each. If uploads fail below that, ask your host to raise post_max_size to at least 32M and memory_limit to 256M.
Phone upload or QR codes don't work
These need your site on https://. Check your site address starts with https in Settings → General.
The BYO tab is missing
Add your BYO quote page in Tee Studio Kit → Branding & links, and check the tab is switched on in the product base's tab settings.
"The product designer is not available right now"
Your site has no active licence: it was never activated, or the subscription ended. Go to Tee Studio Kit → Account (or the licence screen WordPress shows) and enter your licence key, or renew your subscription. Everything switches back on straight away.
Tee Studio Kit says it is paused
Another designer plugin that shares the same product bases is still active. Deactivate it; your product bases are kept and Tee Studio Kit takes over.
Still stuck? Email [email protected] with your website address and a screenshot, and we'll help you sort it out.